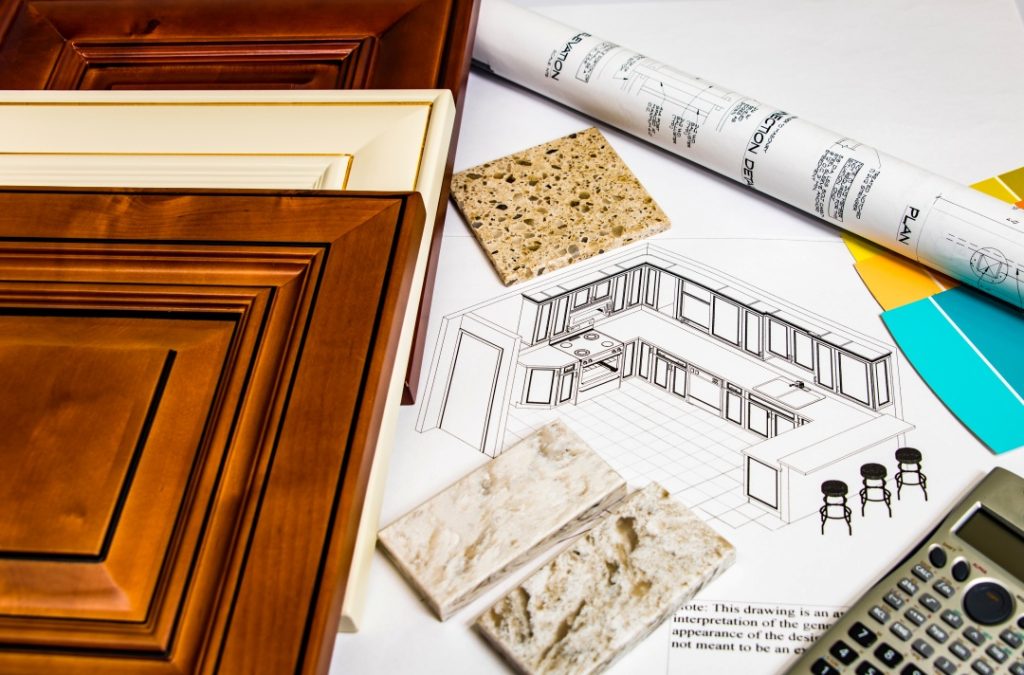
Staining your oak cabinets a different color is a great way to change up their look and add a new style element to your kitchen. This approach is especially popular among homeowners exploring San Jose Cabinet Refinishing to achieve a refreshed, customized appearance. However, it is important to balance the heaviness of oak with lighter finishes for your countertops and flooring.
Begin with a thorough cleaning of your cabinets to remove cooking grease and other stain-causing grime. Next, sand the wood to create smooth surfaces.
Grain Filling
Grain filling is an important step when working with oak because the pores in this open-grained wood can catch pens, pencils and other writing implements. Using an oil-based wood filler, pack the material into the grain and examine the surface against backlighting to make sure it’s completely filled. Once the grain filler is dry, a dewaxed shellac can be used to seal it and then the finish of your choice can be applied. Several environmental and genetic factors impact grain filling, including temperature, moisture and light. Optimal grain filling promotes kernel development, stronger sink capacity and higher yields. (10)
Grain filling requires both carbon assimilates remobilized from reserves of C pools in vegetative organs pre- or post-anthesis and assimilates currently produced in photosynthetic tissues, whereas nitrogen plays a key role in promoting sink size establishment.
Staining
Oak cabinets provide a warm, rich aesthetic that complements many kitchen styles. Whether you choose to retain that traditional feel or add a more modern look, your stain color choice is crucial. While lighter stains will give your kitchen an on-trend look, you can also opt for deeper colors to make your cabinets look more substantial and mature.
Staining is a process that requires careful attention to detail to achieve the best results. You will need to sand your cabinet doors and cabinet boxes before applying any stain. This is essential to creating a smooth surface that will hold the stain evenly. The sanding process will also help to remove any imperfections and existing finish that may not be compatible with your chosen stain.
A cabinet expert can recommend the proper sanding method for your specific project. A sheet sander can be used for larger, flat areas and a manual sanding sponge can be used to reach tight spaces or more intricate details. A sanding sponge has the benefit of being flexible, helping to get into more intricate corners without damaging the wood. Once you have a smooth, even surface, it is time to stain your oak cabinets. It’s important to apply thin coats of stain to avoid blotching or uneven coloring. It’s also a good idea to use an extra clear polyurethane topcoat to protect your new finish.
Polyurethane is a hard, plastic-like finish that’s easy to wipe clean. It’s available in a variety of sheen levels and offers added durability against scuffs and moisture. You can also choose a more traditional varnish, although this type of coating can yellow or discolor over time.
Painting
A painted finish gives cabinets a sleek, modern look that often works well with oak. A good paint job also can cover blemishes like chips and scratches, but it’s important to prep cabinet doors and drawer fronts correctly for painting, including a light sanding and cleaning with degreaser or TSP to remove stubborn oil and wax buildup.
A few coats of high-quality acrylic paint will give your kitchen a fresh, updated look. Choose a sheen that will allow the grain to shine through, but will still be washable and durable. For example, a glossy sheen can highlight the grain better than a matte sheen but may be harder to clean as it attracts dust and smudges easily.
This option can be ideal for homeowners who want to refresh the color of their cabinets without sanding down their current finishes and spending more money on restaining. A popular stain color for oak is Golden Pecan, which provides richness and style that will work in any kitchen design. It’s important to apply the stain in thin coats, following the grain, to avoid streaking and blotching. Once the stain dries, it should be sealed to preserve its durability.
However, it’s also possible to refinish your oak cabinet doors to update their color without spending much more than what it would cost to paint them. This option is often best if your oak cabinets are in great shape but are in a style that clashes with your kitchen décor, or if you want to make your oak cabinets lighter to help them blend in with other wood features (such as hardwood floors) in your home. Refinishing can be difficult and labor-intensive, and requires a lot of prep work, but it’s an effective way to save your cabinets and create a more updated appearance.
Common Challenges
Oak cabinets have a lot of visual appeal, but they can quickly become dull and discolored over time. Fortunately, professional cabinet painting can help bring them back to life and protect them for years to come. The right process, products, and skills can help avoid common cabinet painting mistakes and make the difference between a successful or unsuccessful project.
First, the cabinets must be prepared. The surface must be clean, as cooking grease, fingerprints, and dust need to be removed. A degreaser or cleaning product designed for kitchen surfaces will help get the job done. Next, a thorough sanding needs to be performed. Oak is a dense, porous wood and can be difficult to sand down without leaving scratches or dents. This makes it important to use a high-quality sander and apply steady pressure, rather than slamming the cabinet doors with them.
Once the sanding is complete, the next step is priming. The type of primer used will depend on what kind of look you are going for. If you are using a light color, it is best to go with a stain blocking primer that will seal in the wood’s natural oils and old stains. This prevents them from bleeding through the final coat of paint.
Other issues to watch out for include tannin bleed and dye migration, both of which can be hard to control with the right primer. The deeper pores in the oak can also cause paint to crack, even if it is a top-quality product. This can occur if the product is applied too thickly or if the cabinets aren’t allowed to dry completely between coats. A top-rated refinishing company will know the right techniques to avoid these problems and ensure a flawless finish.
Design Trends
Oak cabinets are experiencing a resurgence in kitchen design, as homeowners are drawn to their natural beauty and versatility. This type of cabinetry is able to cater to many different kitchen aesthetics and can easily be refinished to meet the needs of any homeowner or designer.
Lighter stains like white can brighten up oak cabinets and bring them into this decade, while darker stains like saturated greens or reds are also popular options. If you want to accentuate the wood’s grain, opt for a more matte finish rather than a gloss. This finish will minimize the appearance of smudges and fingerprints.
If you are looking for a more dramatic change, adding crown molding and a valance to your cabinets creates a custom look and instantly upgrades them from builder basic to upscale. This is a simple way to make your kitchen feel more luxurious without spending a lot of money.
Another easy way to upgrade your oak cabinets is by changing the hardware. Polished nickel and black hardware work best with oak cabinets, as they offer a classic, timeless style that complements the beauty of the wood. To learn more about choosing the best hardware for your cabinets, check out my article on How to Update Your Kitchen Hardware to Match Your Cabinets.
Oak cabinets are a beautiful choice for any kitchen, but they need to be properly cared for to ensure longevity. Regular cleaning with the right products will help to keep them smudge and scratch free. It’s important to use a cleaning product that is formulated for wood cabinetry, as some cleaning agents can damage or discolor certain finishes. It’s also important to maintain proper humidity levels in your kitchen, as high or low humidity can lead to cabinet warping.